OAuth 2.0 Authentication
Xplorer provides comprehensive OAuth 2.0 support, allowing you to test APIs that require user authentication and authorization. The implementation follows industry standards and works seamlessly with popular OAuth providers like GitHub, Google, Microsoft, Auth0, and more.
Overview
OAuth 2.0 is an authorization framework that enables applications to obtain limited access to user accounts on an HTTP service. Xplorer handles the complex OAuth flow automatically, so you can focus on testing your APIs.
Key Features
- System Browser Integration: Uses your system’s default browser for authentication - secure and familiar
- Existing Sessions Work: If you’re already logged into the OAuth provider, authentication is instant
- Secure by Design: Your credentials never pass through Xplorer - authentication happens directly with the provider
- Automatic Token Management: Tokens are cached and automatically refreshed when expired
- PKCE Support: Built-in Proof Key for Code Exchange for enhanced security
- Multiple Grant Types: Client Credentials, Authorization Code, and Authorization Code with PKCE
Supported Grant Types
Client Credentials
Best for server-to-server authentication where no user interaction is required.
Use cases:
- Backend services calling APIs
- Automated scripts and batch jobs
- Service accounts
Authorization Code
Best for web applications where user authentication is required.
Use cases:
- Web applications with a backend server
- Apps that need user-specific data
- When client secret can be kept confidential
Authorization Code with PKCE
Best for public clients like mobile apps, SPAs, and desktop applications.
Use cases:
- Native mobile applications
- Single-page applications (SPAs)
- Desktop applications (like Xplorer itself!)
- Any scenario where client secret cannot be securely stored
Setting Up OAuth 2.0
Step 1: Register Your Application
Before using OAuth with Xplorer, you need to register an application with your OAuth provider. This typically involves:
- Going to your OAuth provider’s developer console
- Creating a new OAuth application
- Configuring the redirect/callback URL (see below)
- Obtaining the Client ID (and Client Secret, if applicable)
Step 2: Configure Callback URL
This is the most important step for OAuth to work with Xplorer.
Xplorer uses a local callback server that listens on one of the following ports (tried in order):
http://127.0.0.1:8080/callback
http://127.0.0.1:8888/callback
http://127.0.0.1:9090/callback
http://127.0.0.1:3000/callback
When registering your OAuth application, configure the callback URL(s) based on your OAuth provider:
- If you know a port is available (e.g., port 8080 is free): Register just that one URL:
http://127.0.0.1:8080/callback - If your provider supports multiple callback URLs (like Google, Auth0): Add all four URLs for maximum flexibility
- If your provider allows only one URL (like some GitHub configurations): Use
http://127.0.0.1:8080/callback(the first port Xplorer tries)
Note: This is the same approach used by Postman, so if you’ve already configured Postman callback URLs, Xplorer will work without any changes!
Examples by Provider
GitHub:
- Go to Settings → Developer settings → OAuth Apps
- Create a new OAuth App
- Set Authorization callback URL to
http://127.0.0.1:8080/callback - Copy the Client ID and generate a Client Secret
Google:
- Go to Google Cloud Console → APIs & Services → Credentials
- Create OAuth 2.0 Client ID
- Add the callback URLs to “Authorized redirect URIs” (Google supports multiple URLs)
- Copy the Client ID and Client Secret
Auth0:
- Go to Applications → Create Application
- Add the callback URLs to “Allowed Callback URLs” (comma-separated or multiple entries)
- Copy the Client ID and Client Secret
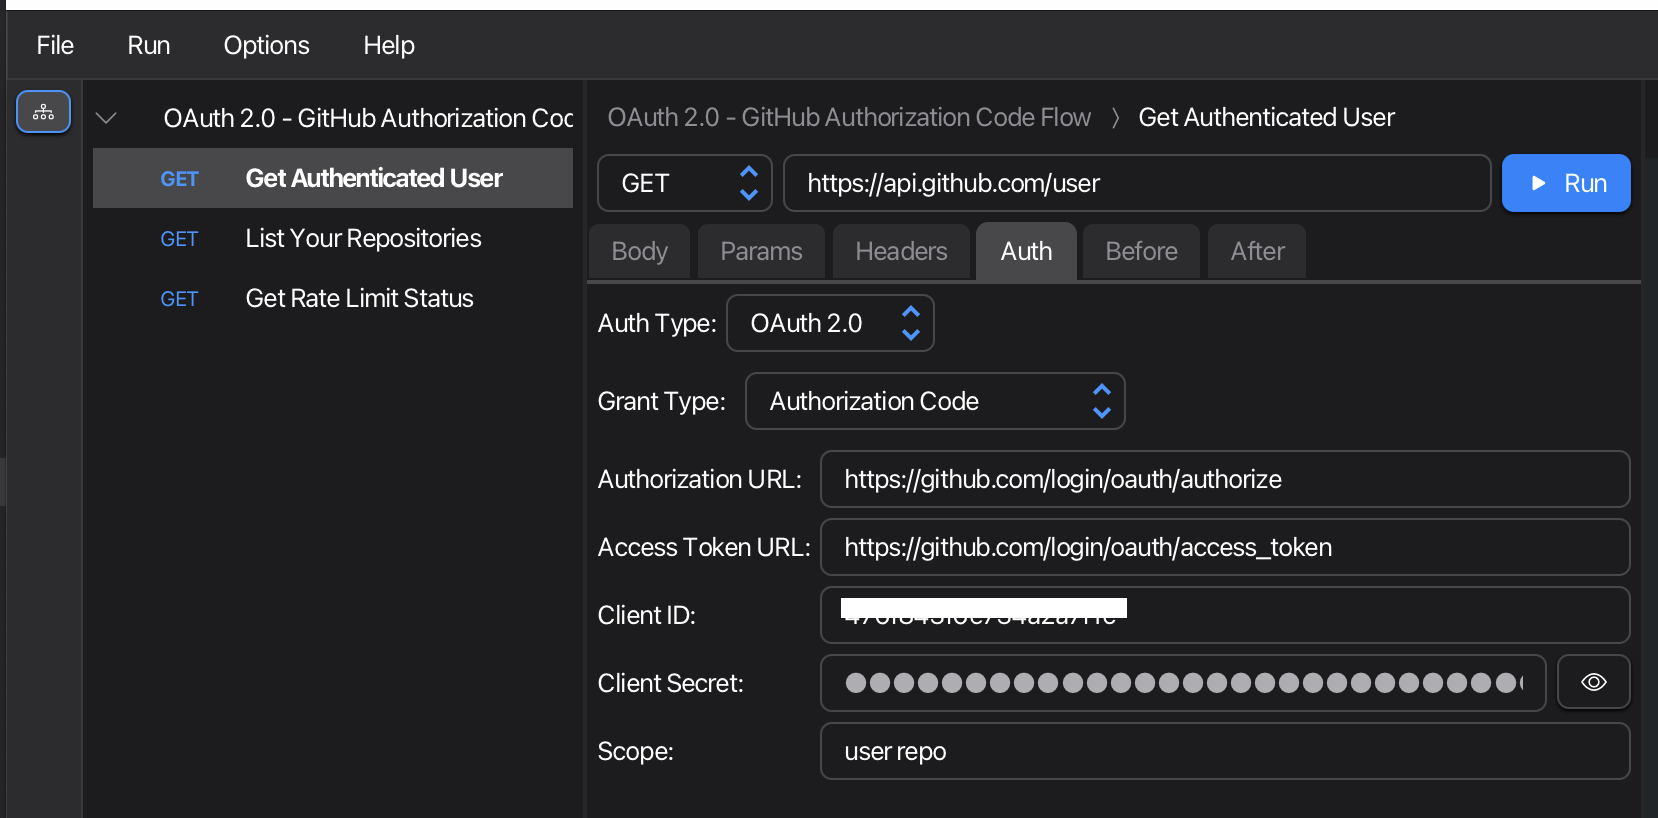
Step 3: Configure OAuth in Xplorer
- Open a request that requires OAuth authentication
- Navigate to the Auth tab
- Select OAuth 2.0 from the Auth Type dropdown
- Choose a Grant Type (Client Credentials, Authorization Code, or Authorization Code with PKCE)
- Fill in the OAuth configuration fields:
For Authorization Code or Authorization Code with PKCE:
| Field | Description | Example |
|---|---|---|
| Authorization URL | Where users log in | https://github.com/login/oauth/authorize |
| Access Token URL | Where tokens are exchanged | https://github.com/login/oauth/access_token |
| Client ID | Your application’s client ID | 476f843f6e734a2a7f1c |
| Client Secret | Your application’s secret (optional for PKCE) | 4fe602... |
| Scope | Permissions requested | user repo |
For Client Credentials:
| Field | Description | Example |
|---|---|---|
| Access Token URL | Token endpoint | https://oauth.example.com/token |
| Client ID | Your application’s client ID | your-client-id |
| Client Secret | Your application’s secret | your-secret |
| Scope | Permissions requested (optional) | api:read api:write |
Using OAuth 2.0
First Request - Authentication Flow
- Click the Run button on your request
- Browser dialog opens with the OAuth provider’s login page
- Log in with your credentials (or skip if already logged in)
- Authorize the application - grant the requested permissions
- Dialog closes automatically after successful authorization
- Request executes with your access token
- View the response in the Output pane
Subsequent Requests - Token Reuse
For subsequent requests using the same OAuth configuration:
- Click Run on any request with the same OAuth config
- No browser dialog - cached token is used automatically
- Request executes immediately
Xplorer automatically handles token refresh when the token expires, so you only need to authenticate once per session.
Example: GitHub OAuth
Here’s a complete example using GitHub’s OAuth:
Collection Configuration
{
  "auth": {
    "type": "oauth2",
    "oauth2": [
      {
        "key": "grant_type",
        "value": "authorization_code",
        "type": "string"
      },
      {
        "key": "authorizationUrl",
        "value": "https://github.com/login/oauth/authorize",
        "type": "string"
      },
      {
        "key": "url",
        "value": "https://github.com/login/oauth/access_token",
        "type": "string"
      },
      {
        "key": "client_id",
        "value": "your-github-client-id",
        "type": "string"
      },
      {
        "key": "client_secret",
        "value": "your-github-client-secret",
        "type": "string"
      },
      {
        "key": "scope",
        "value": "user repo",
        "type": "string"
      }
    ]
  }
}
Sample Requests
Get Authenticated User:
GET https://api.github.com/user
Authorization: Bearer <token-automatically-added>
List Repositories:
GET https://api.github.com/user/repos?per_page=10&sort=updated
Authorization: Bearer <token-automatically-added>
The Bearer token is automatically added to your requests by Xplorer after successful OAuth authentication.
Security Considerations
Why System Browser?
Xplorer uses your system’s default browser for OAuth authentication because:
- Secure: Your credentials go directly to the OAuth provider, never through Xplorer
- Familiar: You see the real OAuth provider’s page with proper SSL certificates
- Session Reuse: If you’re already logged in, authentication is instant
- Transparency: You can verify the URL and certificate in your browser
HTTPS Requirement
For security, OAuth providers typically require HTTPS for their authorization endpoints. Xplorer works best with HTTPS OAuth providers.
Recommended providers: GitHub, Google, Microsoft, Auth0, Okta, and other major OAuth providers that use HTTPS.
Troubleshooting
Browser Dialog Doesn’t Open
Issue: Clicking Run doesn’t show the browser dialog.
Solutions:
- Check that you’ve selected the correct Grant Type (should be “Authorization Code” or “Authorization Code with PKCE”)
- Verify your Authorization URL is correct and uses HTTPS
- Make sure all required fields are filled in
“Invalid Redirect URI” Error
Issue: OAuth provider shows an error about the redirect URI.
Solution: Make sure you’ve added the callback URLs to your OAuth provider’s configuration:
http://127.0.0.1:8080/callback
http://127.0.0.1:8888/callback
http://127.0.0.1:9090/callback
http://127.0.0.1:3000/callback
Token Expired Errors
Issue: Getting 401 Unauthorized errors on subsequent requests.
Solution: Xplorer automatically refreshes tokens, but if you’re still seeing errors:
- Some OAuth providers don’t support token refresh
- You may need to re-authenticate manually
- Check your OAuth provider’s token lifetime settings
Port Already in Use
Issue: All callback ports are in use.
Solution: Xplorer tries ports 8080, 8888, 9090, and 3000 in sequence. If all are in use:
- Stop other applications using these ports
- Or restart Xplorer to try again
Tips and Best Practices
- Use PKCE for Desktop Apps: Authorization Code with PKCE is more secure for public clients like Xplorer
- Set Appropriate Scopes: Only request the permissions you actually need
- Test with GitHub First: GitHub OAuth is well-documented and works great for testing
- Keep Client Secrets Secure: Don’t commit OAuth credentials to version control
- Use Environment Variables: Store sensitive values like Client ID and Secret in environment variables
- One Authentication Per Session: Once authenticated, the token is cached for all requests in the collection